7.28.2011

Soap in a Vase

Hello hello! I haven't posted in a while.. (THREE days!).. sorry!  I must admit it has been a BIT discouraging that I have only three followers.  But I am forging on because I LOVE my three followers and I <3 doing this blog.

I've been working on this ongoing Soap project that I first saw @ Green Bean's Crafterole where she dips fabric leaves in Melt & Pour soap in order to make one time use hand soap for the bathroom.  It looks beautiful and it's functional! 
{Brilliant!}

I decided to make mine using fabric flower petals that are used to sprinkle on tables at weddings.  Then I grabbed a super CUTE vase from the dollar store and sprayed the word "suds" on it using Rustoleum's frosted glass spray.  Here's how it turned out.

it says SUDS!


Now, the reason this project has been ONGOING for me, is because I've struggled so much to get my melt & pour soap to work like hers.
You can see here, my petals are not so smooth, they're a bit bubbly.  I think it's because of the soap I used, it dried really fast and made it difficult to create a nice smooth finish.  It still worked, but not super successfully.  Hopefully your soap works better!


  Soap Petals
You ONLY need:
 A few cubes of Melt & Pour Soap
  Pyrex Measuring Cup
Waxed paper
Tweezers
Fragrance Oil
Some fabric (polyester) in whatever shape you like (leaf, flower petal, rose petal, etc)

1.  Melt cubes of soap in Pyrex in the microwave.  Put in for 1 minute at half the power, or however much it takes until your amount of soap is just melted.  Don't overheat.
2.  Once out of microwave, take your tweezers, grab a petal and dip into soap.  Make sure it's fully covered, then pull out, let drip, then place on waxed paper.
3.  Continue with all your petals until the soap is done. 
4.  Let dry!  Done!


Frosted "S U D S" Vase
You need:
Shallow dollar store Vase
Frosted Glass Spray
Painter's tape
Alphabet Stickers
on sale @ michaels.  woot!

alphabet stickers

1.  Take your vase, place painter's tape making a rectangular space that is 3 5/16" long by 7/8" high .  Cut tape into three 1/4 inch strips and place strips along the space leaving four square spaces that are 11/16" by  7/8" each.
2.  Take your alphabet stickers (s, u, d, & s), and place one letter in each space spelling "s u d s".  Rub over all the tape and stickers very hard with the back of your nail to make sure it's stuck on well.  Once you start to spray you don't want any of the liquid going under the tape.
  3.  Spray according to manufacturer's instructions.  Do very light sprays side to side, don't hold down on the trigger.
4.  Let dry.  Carefully remove stickers and tape.  Your letters will be revealed!

Now take your dry soap petals, place them in the vase, and Wa-LA (reference to my dad).


{beauty} in the bathroom

Soap Up!


BWS tips button

Pin It

7.25.2011

Yummyness.... courtesy of Martha!

When I woke up on Saturday morning I was absolutely starving.  My stomach felt like it wanted to eat itself.  I have no clue why I was so hungry, but when I went downstairs I saw there was nothing to eat.  I know, I sound like a child, I am, a 29 yr old child that is!  :)  Even though there were eggs, and bagels, and yogurt. . . there was nothing I felt for.  Plus, I'm so sick of eating e g g s, b a g e l s and y o g u r t!!   I need something healthy!  Well, okay, what I mean by healthy is something non-dairy and non-white bread!!! 

So I just got the new issue of Martha, and there was this yummy looking pasta salad thing on the cover.  I knew we had tomatoes, so I decided to make it!  Let me tell you, it was SO REFRESHING and SO TASTY.  Perfect for a summer afternoon.  You've absolutely got to try it!!  I adapted it slightly, but it's basically true to the recipe in the mag..

Pasta w/ Heirloom Tomatoes 
Serves 2

4 cloves garlic, mashed in garlic crusher
1/4 to 1/3 cup olive oil
3 heirloom (or any type) tomatoes, slice into 1/2 inch wedges
 1/3 cup torn fresh basil
1 tablespoon capers (chopped quickly)
1 teaspoon lemon zest (don't skip out on this)
crushed red pepper flakes (as desired)
farfalle pasta (bow-tie pasta)

1. Heat garlic in oil, in saucepan, over low heat for 10 minutes.  Take off when garlic is pale gold coloured.  Let cool for a little bit.
2.  Combine tomatoes, 3/4 of the basil, capers, lemon zest, red pepper flakes, and 1/2 tsp salt in large bowl.  Pour the garlic oil mixture on top to marinade.  Put in fridge for 1/2 hour.
3.  Grab about 3 handfuls of the dry pasta.  Make the pasta according to manufacturer's instructions.  Preferably cook until al dente.  Drain pasta, pour cold water over it and drain again, pasta should be just warm not hot.  
4.  Pour pasta over tomato mixture and combine.  Season top with salt, pepper, remaining basil and some more lemon zest.  Serve!

fresh basil in the kitchen
 
the tomato mixture! (my final picture wasn't graphically pleasing, so i've omitted.)

Final product, according to Martha.  Yours will have farfalle pasta, however.
  
BUON PRANZO!


7.23.2011

Tim Hortons Coffee Cup Pin Cushion Tutorial

I have a few crafts on the go right now, but nothing completed.  As a result, I figured why not post a project I completed in the past?!  {wonderful}

When the craft club with the girls first began, we had decided we would all make pin cushions together.  They came over to my house, and my friend Meowie (as she will be named here) brought some Tim Hortons coffee (mmm!) with extra empty cups.  Since she has such good forethought she thought we could use them as the skeleton for our PIN CUSHIONS. She actually did end up using hers as a skeleton, covering it in felt and making a cute little cupcake cushion!  But then Ang brilliantly suggested we just do coffee cushions!  So an idea was born!  {Good} ideas happen in teams I think.  :)  A classic Canadian icon was now going to be turned into a holder of pins.  I'm not sure if it's blasphemy, but I sure like it!  So without further ado...

HERE IS A SNEAK PEEK..!


milk swirl

Let me just add, before we begin the tutorial, that all you folks that are not living in Canada or the Northern States, you can simply switch up the cup for a Dunkin' Donuts cup!  I'm not sure what the equivalent would be in Europe, not sure there is one actually!  But if there is, just use your favourite coffee joint's cup as substitution.

Tim Hortons Pin Cushion Tutorial

What you'll need: 

ONE Tim Hortons Coffee Cup (or cup of your choice) 
Felt fabric - one sheet brown, one sheet white
Polyester batting
Sewing needle
Sewing thread
Glue gun or other glue

Step 1.  Make the cup base.  Take your Tim Hortons cup and, using scissors, cut the cup in half, 1cm under the logo.  The cut on the bottom of the top half may not have been perfect, so just clean it up a bit after you make the cut.  Now take that bottom piece, turn it upside down, and insert it into the top half.  It should fit in pretty snug.  Take your glue gun, and glue where the bottom of the bottom piece is touching the inside of the top cup. 

See the glue??

Step 2.  Cut out your felt.  Grab a bowl or something round, (8-9" in diameter), and trace a circle onto your brown felt.  Cut it out.  Now cut out your milk swirl; just free hand it.  Take your white felt, and starting as if from the outside of the swirl as you can imagine it, start to cut a slightly wavy circle.  Once you reach the area of your first cut, keep cutting inside of that, and keep going around until you reach a 'centre'.  Once you reach 'centre', start cutting back out,  this will form your swirl once you reach back to the point of your initial cut.  Make the swirl just about 1cm thick.


Step 3.  Create your coffee pin cushion ball.  Take your sewing needle and thread (doesn't matter what colour) and baste stitch the very edge of your brown circle.  Once you reach the end, pull on the thread, this will gather the fabric.  Keeping it gathered, with decent hole opening, take your batting, and start stuffin'!!  You want to stuff it enough that the sides are pretty well filled out, so really shove it in there!  Don't be shy!  Once fully stuffed, pull hard on the thread, but try not to break it, or you'll have to start all over!  You want to pull it so you have only maybe a 1 or 2 cm opening.  Don't cut the thread yet.

Step 4.  Attach ball to cup.  Now, pin still in thread, poke the needle through a spot on the bottom cup you just glued and pull through.  You can now place your coffee ball on the top of the cup.  As seen in the first picture, you will keep poking the needle back up and down all the way around so as to secure the entire ball right onto the cup.  This part is pretty tricky.  When you poke the needle back up, try to poke as close to the place where the felt meets the top of the cup, the thread still won't be visible, and then you can poke it back down the same way.  Keep going around as much as needed.  I honestly don't know how I got my bottom to look so neat, but if yours is not, it doesn't matter, nobody will see it!  On your last poke down, make a knot at the bottom. 

Step 5.  Sew on your swirl!  Place your swirl on top of the "coffee".  Position it how you like.  Take some white thread, and sew it right on!  I sewed it around the edges, not in the middle.

And "Wa-LA" (making fun of my dad, that's how he says it), you're DONE!

There you have it.  Gold...


...becomes more gold!


Please try it out and let me know how it goes!

Happy Sewing!


Love Notes by Lauryn


Pin It

7.21.2011

It's funny... 'cause it's true

This is seriously me in a nutshell.  When I read this I couldn't help but crack up; if you're a fellow procrastinator you know exactly what I mean.   I procrastinate with EVERYTHING.  When I was young.. for some reason I always found when I would do homework with friends I was always more interested in helping them do their homework than finishing mine.  I just could not bring myself to do my work!  In University I spent MANY a nights up until 6am solely because I had not finished an essay that was assigned at the beginning of the term and was now due the next day...at the END of the term.  Exams.. same deal.

I've tried to psychologize myself, and I've come to the conclusion that it's because I don't want to fail or be a failure.  My subconscious says if you can't get perfect, just don't do it at all.  Then the positive reinforcement to my bad behaviour arrives in the form of a good grade when I DO procrastinate.  So I can't win.  It's the worst most horrible most vicious cycle ever.  I can't escape it.

Now on to the point of this post.. I have an interview on Friday!!!   Talk about last minute, I just found out yesterday night!  Now I'm procrastinating on preparing for the interview!  I really need this job.. and yet I still can't seem to buckle down and get going!


SIGH.  Okay, how about I start right here right now.  Something useful and informative..  Well, I've just read about the Acronym STAR, which stands for Situation, Task, Action, Result.  It's always best to structure your answers in this format when asked a question that requires you to 'recall a situation when..'.  It allows you to organize your own thoughts as well as shows the interviewer that you know what you're talking about, and can convey it in a concise and clear way.  Also, if they were going to have any follow up questions you just may have already answered them, which is good!  Now let's take an example of said scenario shall we?

s a m p l e  q u e s t i o n:
Interviewer:  Tell me about a time when you had to use your analytical skills 
Me: Uhh, okay, I got this.  Ummm, I duno.  Seriously, I don't know.  OMG, please, I'm really nervous...I can't think
Interviewer:  Thank you for your time.
Me: baAaaahhh!!  =*(  I'm smart I swear!! (tears begin to stream out of my eyes in cartoon-like manner)

SEE!!  see!!!  I can't even take this seriously!!  A procrastinator 'til the day I die...  represent!  ;P   I think I'm gonna go take some quiet time... you know... to reflect on all this.  I'm going to prepare for the interview too.......tonight at 11pm of course. 

7.20.2011

{Some Wonderful Things..}

 Some random things that made me happy of late...


you talkin' to me?
Meet one of my three nephews.  Words can't express how special this little guy is (I knooowww, every aunt/parent/grandparent says that) but he REEALLY is!  :)  He is so independent, so innocent, and just a down right good boy.   Now don't get me wrong, he's still a boy so he's still a very rambunctious little mischief maker.  But he always does the right thing, and he always tells the truth even when he gets in trouble.  Anyway, I could have chosen one of the nicely taken pictures where he was staring right into the camera smiling merrily with his ice cream, but this picture is just so typical of the hilarious expressions he always inadvertently makes.  It's priceless.   He's priceless.  And there he is, just chillin' on the back patio with me and my dad.. him.


I bought these when I was in Italy at this store called EATaly.  It was an awesome store, a bookstore, mixed with foodie goodies which all support the slow food movement.  They also serve food there in keeping with the values of the movement!  All fresh local ingredients.  {wonderful}.  So, I had to get something to commemorate my love of this store!

I love the bottle of the ginger drink!  The font, the colour, the graphics.. for some reason it just makes my heart skip a beat.  It's just..beautiful.  I wish I could drink drinks like this at home, all the time.  My refrigerator door would be lined with them.  Ah, so beautiful and perfect that would be.  I can imagine it would be similar to the feeling of living in an IKEA ad.  Everything in it's place, everything perfect, everything looking awesome.

Also, I couldn't resist the tea cup w/ the mini milk jug!  When I saw it I immediately imagined myself snuggled up in bed on a cold rainy day, pouring milk into my Earl Grey filled tea cup.  ;)  Do I sound nuts?  Please forgive me, I'm like this sometimes... :(


This was handcrafted by yours truly on Friday.  Yum.  It's Strawberry Shortcake.  Actually, I've been told the "cake" wasn't really cake.  Then I realized it wasn't really either. It was more of a biscuit texture.  The jury is actually still out on how good it tastes.  All I know is EYE sure like it.  I think my friends thought it was at least decent..!.  It's okay, the atmosphere of sitting on the patio, eating strawberry...err, biscuit with my friends, while the sun was slowly setting, made it extra good!  :)


This is Welcome, Ontario.  Can you believe there's a town called, Welcome?!!  Like, who lives there?  It's just such a delightful town name that there has just got to be some sort of strict requirements as to who can take up residency there!  One sour grape would just ruin the whole inspiration of the town name itself!  So, I'm thinking this is what the questionnaire must ask..

CRITERIA:  
○ Do you have a kind/benevolent nature?
○Do you go out of your way to be social and friendly?
○Do you smile at least 75% of the day?
○What do you like better, rain or rainbows?
;)

You get the idea.  :)  I cannot imagine a grumpy old man living in Welcome.  I certainly can't...I won't!

7.19.2011

And the problems begin...

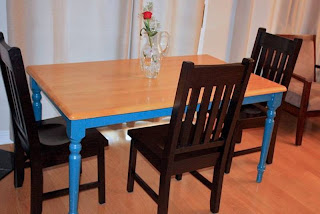
OKay, so I've begun the sanding.  I think I sanded for about 5 hours yesterday (probably more but I don't want to admit it to myself).. and I'm only barely done HALF the table.  Someone please tell me if that is right or wrong?!  I went on the site TLC home and they have an article about refinishing wooden furniture.  Quite informative, though some things I'm not quite sure I understand.  Also, they recommend HAND sanding the furniture.  Ummm, 'scuse me?  Seriously, my DeWalt is taking long enough, I doubt my hand will do a better job (insert dirty joke here).  So here is the progress..


in it's natural state, scratched up and wonderful!
part sanded/ part somewhat sanded/ part omg when will it be done!


ahh :)  i could stare at this area forever, nice plain wood

where sanded meets unsanded
Now I will admit...I made a big boo boo.  I sanded the whole thing with a heavy grit paper right down to the bare wood.  Now I read that you're not supposed to do that and you're supposed to use finer and finer paper as you go.  Arg.  We'll just have to see what happens.  I'll try to do that with the rest of the table, I just don't have that much varying degrees of fine to coarse paper on hand.   And yes, I am too lazy at this moment to go get more.   Let's just say I'm more of a "let mistakes happen then fix them and then learn from them " kind of girl.  :)  hee.  More to come...

7.18.2011

The weekend

Quite a bit went on this weekend..!  A welcome change as most of the time I just like to veg out.  Last week I visited the page of one Miss Korrie @ Red Hen Home and now my life has completely changed!  She restores furniture in the most exquisite way.  All I want to do now is go on kijiji, buy furniture, and refinish it.  Of course, I have no clue in the world how to do that exactly, but I'm sure gonna try!!  :)  For some reason I feel if I can make something old and not so obviously beautiful into something amazing, then I will have done something good and useful.

 I've found my true calling.

Okay okay, let's not be so dramatic.  hee.  :)  But I'm really excited and can't wait to see if I will be able to finish a table and have it look decent enough that others want to possess it.  :)    

This is my goal.

I, of course, immediately set up two appointments to pick up two tables from two separate people on the weekend.  One of them, I will say was a good pick (I think, from my limited knowledge) and the other, hmm, how can I say this gently..?  It's a useless piece of crap.  I wouldn't even be able to PAY someone $10 to take it off my hands, and I had to PAY $10 for it!   The kicker is, her asking price was $20!!  Now you might ask, how did I get stuck with this rotten lemon of a table if I was able to inspect it when I went to collect it from the owner?  Well, I wasn't the one that picked it up!  I'm kicking myself still.  

solid wood, really?!
 The nerve of this seller!  
Her ad said "SOLID WOOD ROUND TABLE"
Since when does chip wood and flaking off veneer = solid wood??
Funny thing is, I even specifically asked if it was a veneer even in SPITE of her ad saying solid wood, it went exactly like this:
Me: Is this a wood core table with a veneer on top, or is it solid wood? 
Her: It is solid wood
Me: So when you look at the bottom of the table and the top, the wood is the same?
Her: Yes

It was CHIP wood on the bottom!!!  I'd really like to give her the benefit of the doubt here, but there is NO excuse for her.  grrr.  >=T     But you know, it's all okay because you live and you learn.  The only way I can learn more about the process of furniture restoration is to do it, and I think this is part of it.  I won't be fooled again!  We hope.  
 
 And this is my potential beauty...

Now, let me just say, the table does NOT look like this.  I am a bit miffed, not that it matters because I was going to finish it anyway, but they kind of misrepresented the table a bit in their ad too.  This must have been a picture of the day they bought it, because it is not as neat and clean as this!  sigh.  People nowadays.  You can't trust 'em... You can't... kill 'em?  haha ha..  JUST KIDDING.  =I   seriously, kidding.  :)

I mean, what if I had to drive 30km away to go pick these items up?! 

Anyway, I hope to fix it up by painting on some french writing, just like on Red Hen Home.  I'm a copycat what can I say.  I'm gonna need some more experience before I can branch out and be creative.  :)
Wish me luck!  I think I need it!


7.12.2011

Projects, Projects, Projects...

So many projects, SO LITTLE TIME!!  I know, I should be focusing on the job search and school...and I am... I've just ALSO been working on finishing up a couple projects I've had going for a while.

Last year, I found this hideous, hideous forest green side table on somebody's driveway getting sent to the trash.  Now, I mean it was ugly like, found in the attic at your grandma's house covered in cobwebs and spiders kind of ugly.  The style itself isn't beautiful.. but it had a cute little drawer and I thought I could fix it up to look nice.

unfortunately i didn't take any pictures of it before i began fixing it. :(

MY BAD!  This whole blog thing is new to me, so I didn't realize how important pictures are in the chronicling process.  Now I know!  You'll just have to trust me this time that it was 20 years too late for it's date with the wood chipper.  The process was quite difficult.  For such a small table, all the legs and little parts took a really long time to sand by hand.  The green was so strong, I had to prime it white, then I used THREE bottles of rust-oleum satin spray paint in "Heirloom White" to finish.   Here's a look at a bit of the process:
sanding done, sprayed first coat

these legs were so DIFFICULT to sand!

I must say, finished product still looks bland.  I originally intended to give it an antique look, and I still can, I'm just still learning how to do that.  I can't decide if I should do crackle effect, or the "browning" look where you put brownish paint on those key spots in order to make it look warn out.  

Anyway, then to spruce it up a bit more, I decided to line the inner drawer with some fabric..just to give it some LIFE.

elmers spray adhesive, it doesn't disappoint

template for fabric cut out
I used the paper template in order to cut out a perfect fabric size.  Once I sprayed the elmers on, I had to place it on PERFECTLY otherwise it would stick in places I didn't want it to and look messed up.  THANK GOD it worked out.
And the final product....

still bland, right?

i think i love the drawer the most!

I'm actually glad I'm done.  I spent a LOT of days baking in the sun trying to spray paint this thing.  I don't think I would ever spray paint again, it's not worth it.  Painting is much easier and I think gives it a better finish.  Also, side note, if you ever do want to buy spray paint and you frequent the U.S., the bottle of spray paint I bought was $6 compared to $3 at the Home Depot there.  Also, the chalkboard paint here is maybe $22, I got it for $9 there.  

Anyway, next time I will definitely spend my efforts on a piece of furniture that I more enjoy the look of, even though it may have ugly elements.  I will let you know how the antiquing goes...suggestions??


** update: I posted this table on kijiji and got some interest!  though nobody has followed through.  :(  however, i really want to refinish some more things.. so it's very encouraging! 

**further update: SOLD!!!  To the lowest bidder @ $35.  You know what I'm just happy it's gone and someone loves it and wants to use it!

7.07.2011

Introducing the Principessa...

 
the face only a mother could love??

Principessa means Princess in Italian and Tutu, the absolute love of my life, could not be more of one.   I guess all cats are to an extent.  Tutu takes it to a whole other level though.   She is the cutest, sweetest, bitchiest little girl.  
And I {love} her to little goopy pieces. 

It's really difficult for me to say the L word, but because she's a cat, it's a lot easier.  I have an endless amount of names for her, sometimes lasting a day, a week, or months.   Right now her latest fad nickname is Jiggabot...don't ask me why.  I must have been watching transformers and listening to Jay-z or something.  hee.   :)

I just love calling out to her and having her around.  I know she likes just having me around too, because she always follows me around the house but is sure to never get too obviously close.  If she's sleeping on my bed with me and I leave the room, it's only a matter of minutes before she will leave too.  Even if she's snoring up a storm.  And she ALWAYS attempts to sleep on my stomach when I'm on my laptop.  I take those moments as her expressing her affection for me.

When I was leaving for the airport to go to Italy, she could care less, but I was so sad to leave her.  When I came home, she serenaded me with a couple meows and in her caring, yet still aloof, way, stuck by me and "allowed" me to snuggle with her.  It was soooo wonderful.

Ah... the love of a cat

I think it takes a very specific type of person to love a cat.  Someone who doesn't mind giving more love than getting.  I don't know if that's a good thing or not... it just is what it is.   Cat lovers want love from their pet, just like dog lovers, but they don't want to take the easy way out and get a dog.  A dog will love you even if you smack it around and call him names.  It's such an effortless relationship.  A cat will take you to account for your actions.  They definitely need and give love too, it's just not in an all up in your face kind of way.  I think their independence is admirable; their personalities so unique.  Not to say dogs are just mindless drones,  but they aren't as thoughtful and delicate as cats are.  I know plenty of people who would disagree.. so let's just agree to disagree!

I mean, how could you NOT love a face like that??

attack mode: my arm... a little lamb for the slaughter.  and i still her


7.06.2011

Jewellery Crafting..! Woot..!

Well I haven't blogged, again, in a while.. sigh.  ALWAYS an excuse.  This time it was studying & I went on a trip to Italy.  So, I thought I'd do a post about the project I finished before I left for the trip.

I got together with the girls a couple weeks ago for a jewellery crafting session.  I found this really CUTE fabric necklace pattern on www.amybutlerdesign.com and thought I would try it out while everyone else in the craft club was making necklaces with their wire and pliers (too complicated for me with my poor planning).  I don't really wear jewellery very much to boot, so this bohemian style works well for me. 

The tutorial for it can be found here http://www.amybutlerdesign.com/pdfs/FabricNecklace.pdf .  She has some other really inspiring free craft patterns you might want to check out too.

SO, this is what it SHOULD look like...


And this is what I made...


whaddya think??!! 

My apologies for the crumby pics.. I will def post better ones in the future.  But you get the gist.  It was actually surprisingly easy.. though the colours I chose ended up not really working.  CURSE those two dark fabrics!!  =T  gr.  The fabric itself only cost $8 though, and I could make probably 3 more necklaces with that.  The 1" balls you can get in a pack of 24 at the dollar store.  Not bad for an entire necklace, eh?   I will definitely make a second attempt.

NOW, the only problem I ran into was when I finally sewed the tube of fabric together, the balls didn't really fit inside in some spots because they were too big.  I must have cut the fabric in different sizes.  My quick fix was to just open a small hole in the seam and shove the balls in, while simply overlapping the fabric around the ball and then knotting as per usual.   That worked so well I am considering trying again without even bothering to sew it on either side.  We'll see..  if you try it out you'll know what I mean.    Unless yours is perfect of course... and if that's the case..  then......... kudos to you!!  :)   I swear I'm not bitter....;P
Related Posts Plugin for WordPress, Blogger...